Sonntag, 23. Dezember 2018

The Catalina Disaster

As I’ve already wrote when I recieved the Catalina, it was made pretty poorly. Now, just few months later I can tell it was actually crap. But let’s start from where we last finished.

After the day at the lake and the first crash I went home and fixed what was broken and needed to be fixed. On my way to and from the lake I realized how unhandy the shape of the fuselage and this huge wing of the Catalina were. They didn’t even properly fit in my plane bag.
Some days later I rented a small car, put the Catalina inside and went to an airfield for rc planes. There, with all the space and the perfect conditions, nothing could go wrong. At least that’s what I thought. Shortly after arriving I had the Catalina ready. I first tried to start it from the grass but hat to learn that she does not take off properly. Might it be because of the floaters or because of the grass but it didn’t work. I therefore decided to start her from my hand as I’ve already done with some planes. It worked similar to the first time. She took off nicely, gained some air, stalled mid air and came straight down. Unfortunately she did not have as much hight as she had at the lake and so she crashed nose first into the ground.

Once more, the propellers were broken. Also the fuselage was deformed and the cap had taken some asymmetrical shape but the worst was the monting of the wing. The styrofoam was broken and the little screws were all lose.
My Idea was to open the styrofoam, remove the plastic threads and put some metal threads in before I  glue the styrofoam back in shape.
As I opened the styrofoam I heard a bang and I had two parts, the left half and the right half of the fuselage, in my hands. It was not just badly glued, they barely used glue at all.

I’m a man of great patience but not a man of great craftsmanship skills. Once the fuselage was in half and I saw how much plastic they added to the threads I put this mess aside and reevaluated the situation.
The plane is big, unhandy and poorly constructed. The fuelage is in two, the color split off wherever I used tape and I used a lot, the styrofoam is deformed and the props - wether they are the right ones for this plane or not - are broken again. So instead of rebuilding something that will most likely never properly fly anyways I broke the hole thing into pieces and threw it into the garbage. Stupid plane.
Now I’m sitting here, slightly ashamed of myself for giving up so easily and a bit concerned if I will ever get the skills necessary to build the Kingfisher.

Speaking of which: Water has a higher density than air so if the wings are fixed in a way that they stay out in the air but lay onto the fuselage once the plane dives into water, it would reduce the resistance under water a great deal. Should that not be possible with a spring? We’ll see.

Also I uploaded a new video on youtube. Have a look:


Samstag, 3. November 2018

A day at the lake


A home built Dornier from the exhibition
Some days ago my fellow model plane club members and I went to an exhibition of model plane producers. They showed the latest products in all branches of remote controlled stuff. Ships, Cars, Drones and Planes were equally presented. I went straight to the propeller producers and got myself some cutting edge airscrews. Back home I mounted them on the Catalina and finally got her ready for her maiden flight.
If you take a good look you see a monkey
and a plane
The next day - by accident - I met some friends at a lake and of course brought her there. I was a fresh day in autumn and a stiff breeze was blowing towards the lakeside. As I am used by the Easy Glider that one can start with almost any wind as long as you start against it, I knew no fear and prepared the Flying Boat for her maiden.
I put an 3 cell Lithium Polymer Battery (3S LiPo) which is slightly overpowered for the Catalina and had to install the Camera on her tail to balance the battery. To prevent entering water I put some tape on the gaps between the cap in front and the fuselage and I covered the camera with a lot of tape. Then I checked everything and put the Catalina in to the water. As the wind blew her towards the shore I gave her some throttle to put her in position and then took off.
The takeoff was glorious. As elegant and scale as possible she lifted herself into the air after just some one or two meters of acceleration. She lifted slowly into the air and I thought this would be an awesome flight before many as I’ve brought four batteries. Suddenly she took her nose straight to the ground and I had to catch her with a lot of elevator. Then she turned towards the forest behind me and quicker than I could have saved her again she crashed into the next tree and hung in its branches.
It took me some serious climbing to get her back down.
Leftovers after the crash
On the ground I found my glorious new propellers both partially damaged, one of the engine cover that protect the engine from splashing water slightly broken and one floater off the wing.
On my way home I already ordered new propellers - I know the producer now. Tomorrow I might do some glueing on the plastic parts and put some pictures online so that in a week or so I can install the new propellers and get her up again. If she flies as she did at first, it will be a very docile and elegant plane that might merit some upgrades but first there needs to be further testing.

For the video of the maiden flight check here.


The Catalina in her element

Mittwoch, 24. Oktober 2018

Catalina - The building


As it is the sense of the project to fly a plane out of the air into water and back up in the air, I bought myself a so called flying boat. My choice was the Catalina from Dynam.
The Catalina is a “Flying Boat”. This means it has a Body like a ship and wings like a plane. Therefore it can land and start from water. This kind of plane was used in WW II. As Bombers, Rescue and transport planes. Some of them were incredibly huge. Today flying boats are mostly used for firefighting. The most famous of the firefighting planes is the Canadair_CL-415.

The fuselage after my first corrections
As I recieved my Catalina, I was very excited. My first plane able to land on water and swim. I’ve read tons of websites and saw many videos on youtube. One can not imagine all the things I wanted to modify. It should be completely waterproof, have one of the windows in the back able to be opened  so I could put a camera there and film in the passenger view, the floats should be able to be retractable and the whole plane should appear in dark black and bright orange / red.
Today I finished most of the plane. It has none of the above features. Let me show you why and how I managed the building.
By the time I unpacked the Catalina, I realized that the quality of the pre made steps was quite poor. The glue did not keep the plane together properly, the colour was already split off in some spots and the GFK parts on the bottom looked like they were glued on by me instead of a professional.
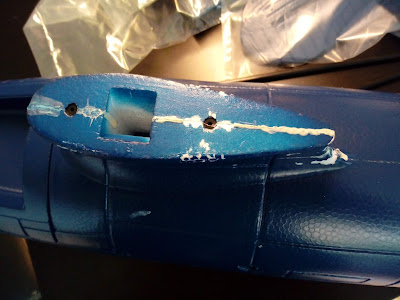
The white line is glue that I had to add
Most of all I was disturbed by those open gaps on the top of the fuselage. I used a specific glue for styrofoam and held the parts together with some duct tape. Then I left it for the night to dry. The next day as I removed the duct tape I had to realize that some of the colour stayed on the tape and left some ugly white stains on the plane.
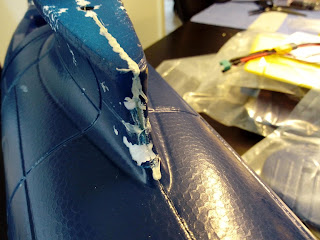
The colour split off
As I got instructed in several forums, I shortened the carrier of the floats by two to four centimeters and put it in a steeper angle so it would not function as a hook in the water when the plane would be taking off or landing. To do this I cut the floaters open, removed the carriers, shortened them and glued all back together. As you can imagine, the floaters are barely yellow now.
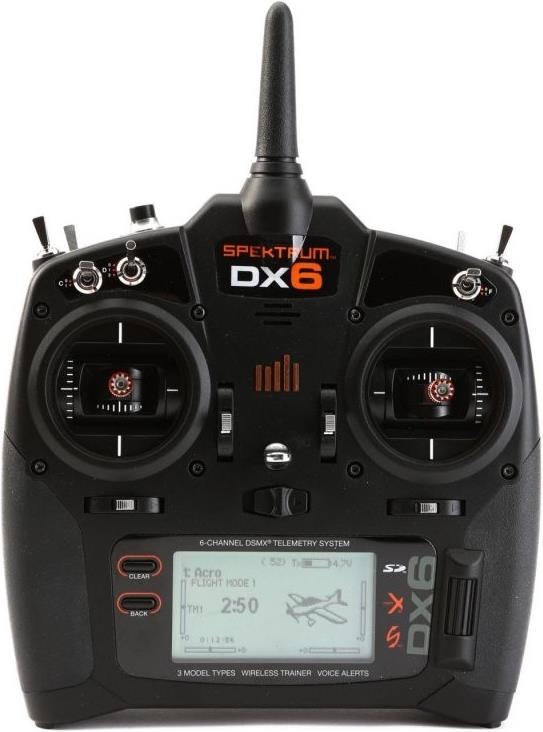
Meanwhile I ordered a reciever from my trusted RC-Store. A great tool from Spektrum, created for full GFK planes with a big range and super fast data transmission. It was as expensive as it sounds.
When it arrived, I put the parts of the catalina together as it was written in the description.
The description was quite simple. Every step has it’s image and there are not that many parts that one could get a problem. I only made some minor mistakes that I could have avoided if I’d have read the instructions properly.
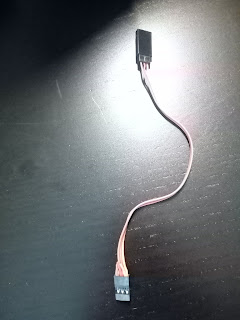
Former Y-Cable now extension
There is this thing with the servo cables that I would like to tell you.
The Catalina has a rudder, an elevator, two ailerons and two engines. In the wings there are two lights that you can turn on and off and set to blink or steady. In the package they deliver you one Y-Cable for the engines so they only take one slot of the reciever and one Y-Cable installed on the Rudder and the Elevator Servo Cables in the fuselage. Even with my little knowledge I knew that you can not put a Y-Calbe on these two Servos.
The Y-Cable takes the signal from the reciever and transmits it to two parts like for example the enginges. These two will therefore always run on the same speed. Or - if you combine the ailerons with a Y-Cable - the servos will always move in the same direction which makes the ailerons move in opposite directions because the servos are installed facing each towards its wing tip. If you combine the rudder and the elevator with the Y-Cable you will have some uncontrollable movement. For example if you put the Y-Cable on the Rudder slot, the rudder will go left and right while the elevator will go up and down accordingly. I should actually try that once I have an old plane ;)
So as I removed the Y-Cable from its wrong place, I thought the servo cables of the ailerons would be long enough so I cut one part of both of the Y-Cables off and used them to extend the cables from the engine to the reciever. Then I put one engine on the throttle slot. This will work as the normal enginge, providing the power to the reciever and getting the throttle signal. Then I took the second engine cable and cut off it’s red cable. The red cable is the + cable and brings power to the reciever. As I just said, the throttle cable already brings power. A second power source could damage the reciever. Then I put the second, castrated, engine on the gear. In the sender I used the “mixer” and put the following settings. 
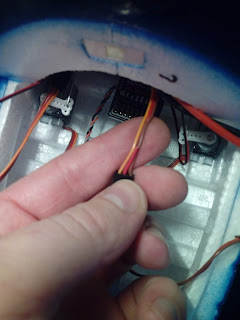
Cut + Cable from one engine
  1. The gear does not have any lever or button as source. If it has a source, you will have trouble programming the following. Believe me, I tried.
  2. Throttle and gear move together.
  3. There are three flying modes: Flying, landing and water. As on my sender there’s no mode called “water”, I called this mode “throttle”. I put the three modes on a switch with three positions as one is always active.
  4. In mode flying, nothing special happens. The two engines move at the same pace.
  5. In mode landing, the ailerons move up. The exact percentage has yet to be found out. As default i put it to 75% while moving the elevator down for 10%. At this mode the ailerons have to go into the same direction so the servos will get different signals. Because of that I could not use the Y-Cable on the aileron servos.
  6. In mode throttle (water) the two engines move at a different rate as soon as I use the rudder. If the rudder goes to the left, the plane should move to the left. The right engine will turn 15% faster while the left engine will reduce its pace by 15%. Vice versa if the rudder moves to the right. This is used to steer the plane on water while the speed is to low for the rudder to have an effect. This was also the reason why I could not use the Y-Cable on the engines. They get different signals from the sender.
As I finished programming all this - with the Catalina  I learned the most about settings and programming my sender - I wanted to try it out. I installed my super expensive reciever in the plane, bound it to the sender and got an error “beep” from both the controllers. Something was wrong.
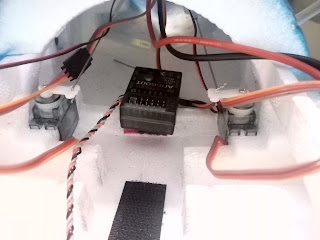
Reciever on a mount so it should not get wet in case water enters
Dynam is a chineese enterprise. The fuselage was in a bad quality so my first guess was:
Something is wrong with the engines or the controllers. After a bit of googling I found out that the problem might be the electricity. I tried  with an other battery but had the same result. I tried to bind again, switch on with the throttle stick up and so far and so far. Nothing worked. After some more googling I learned that this beep emits when the throttle slot of the reciever does not recieve the throttle signal from the sender. I then changed all kind of settings on the sender and put the throttle cable in every slot of the reciever. Still, nothing changed. As I ran out of ideas I asked my friends from the Club and their answer was as simple as it can be: If the engines turn with an other reciever, it’s the reciever… It was the reciever. This super glorious, super expensive peace of plastic just does not work. I have to admit I was a bit disappointed. Now there’s a cheaper reciever in the plane.

The last thing I changed was the running direction of one of the engines. As default, most engines run to the right. Once you turn on the throttle the plane will have a momentum to the left. If you have two enginges this momentum will increase. Not double because the engines are not on the same axis but still. To avoid this, one of the engines has to turn towards the left.
Right now I’m thinking: the left engine has to turn to the right and the left one to the left so they don’t  push / splash the water towards the fuselage but away from it… I’ll have to change that.

Today I’ll go to get the following parts from the store:

A set of propellers, one normal and one inverted (never use different propellers or engines on a multi engine plane. It might lead to crashes.)

As soon as I have these things installed I’ll run my first tests with my ugly but interesting flying boat. You’ll get videos and more pictures soon.
There might be a camera mounted on the front one day ;)
P.S.: The features I intended to build in were not made because of the bad quality of the package. I will test now if it is even waterproof and how it flies. Maybe later I can tune it a bit.
Propellers that run opposite each other are hard to find. I told my seller to find some but until now he did not confirm my order.


Mittwoch, 10. Oktober 2018

Flite Test

The more I fly (and right now I’m flying often) the more I feel the need for information. How does this work, what does that do.
Luckily I can always ask my fellow club members that are often flying for years but to get the latest ideas about it with an educational approach, I found “Flite Test”.
On this web site a young team of RC-Plane enthusiasts shows you how to build a plane from scratch, how to fly it and gives you tips about repairing. There’s also a forum where one can ask questions or publish his one ideas or projects.
Of course there are many other websites like RC NetworkVTH and others but they usually include a lot of reading or paying while on Flite Test there’s videos and a lot of free or at least cheap stuff.

Maybe, once Project Kingfisher becomes more realistic, I’ll publish it there aswell.

Oh and by the way:


Sonntag, 16. September 2018

Contest

Since my last post a lot of time past and a lot of things happended. I’m now slowly able to fly my Easyglider and bring it back to ground without crashing it. Also I can slowly detect thermal updrafts. Once for sure I will create a blog about weather and thermal updrafts.
Today I participated in a contest. It was just a contest within clubmembers but still it was my first contest and so I was curious about how things go.
As it was mostly for fun, any glider plane with an electric enginge could participate. The rules were simple. You take the engine for as long as you want to rise the plane as high as you want. Then you call the referee to start the clock. For three minutes you had to fly before landing in a designated area as close as possible to a marked target.
Already bringing the plane on a good level had it’s difficulties because there was some strong wind coming from south. Once up I failed twice out of four times to stay long enough. Once I landed after just two minutes and once I landed ten seconds before countdown. Still they gave me points.
The same was with my precision. I managed to land safely all the four times yet twice I had to turn on the engine again to bring the plane back up because I was too low too far. Even there, out of courtesy they gave me some points.
The result of the contest are yet to be calculated but I expect to be in the lower ranks. After all, I also was the rookie and the other members had some years of training but I recieved many compliments for my skills for someone flying only since some months.
After all it was a fun event. I will for sure try both, flying for a given time and land exactly on spot, some more until it comes naturally. I think this will help me a great deal for further progress.

Donnerstag, 19. Juli 2018

Improvements

“I’m too poor to buy cheap.” -Some guy on a forum about RC-Planes

It’s quite some time since I posted the last time and a lot of things happened ever since.

On one side I fixed the funman by ordering a new body. Luckily for me, the engine, the flight controler and two servos were already built in so I only had to add the reciever and the battery pack. Also I upgraded it by adding ailerons.

Picture in the Manual of the Easy Glider 4 with the most important expressions
On an other point I bought a real beginner plane. The Multiplex Easy Glider 4. It was not only the recommendation of the seller but also of some guy I met at the store. This guy told me that the Easy Glider 4 is a very simple Plane, perfect for beginners and - if I wish - he could show me some the basics.
Easy Glider 4 by Multiplex
Spektrum DX6
I agreed and he told me to get a better remote control than the one included in the kit. He recommended the DX6 from Spektrum and showed me a Set including the remote and a reciever.
I ordered and got this huge tool full of switches and stuff. It’s a faster computer than the one I have at home ;)


Two weeks later we met on a hill with some other guys. Michael, that’s his name, is in an association of RC-Pilots. It’s mostly some middle aged men sitting together on a little air field, discussing this and that. Every now and then one gets up, takes his plane and does some turns.
Michael showed me how to propperly prepare the plane for the flight, reminded me to always turn on the remote before connecting the battery pack inside the plane and showed me the advantage of ailerons. It took me all afternoon to manage the plane the way they expected it of me. Every now and then someone gave me a tip but they were not pushy or stressing. It was a very relaxed afternoon and it was what it took to finally make me understand how to do some simple maneuvers. In the evening I was almost able to land the plane propperly. Almos because at the very last moment I confused left and right while the plane was heading towards me and it hit the ground. Still it did not hit the ground as hard as it did before.
Since that afternoon I’m motivated to do more. I applied to become a member in the Pilot Association, I tried to program multiple things on all those switches on my remote, I ordered new recievers so I can fly all my planes with one remote and so far.

Today then I took the Funman, my Multiplex remote and two battery packs and went for a flight. It was awesome. I finally manage to control the movements of the plane and every time I “landed” it without completely destroing it. I even managed to mount the mobius action cam and make a movie about it.

Samstag, 30. Juni 2018

How long still?

Project Kingfisher is about building a plane which is able to fly and dive into water and fly out of it again - just like the bird can. If possible, it should also be able to film it’s flight/dive.
To start, I am learning how to use a radio controlled plane. I thought it would be the easy part but actually it’s pretty difficult so I looked around and found somebody willing to teach me the basics. I’ll have my first lessons in a week.
Also I’m reading books about RC-Planes and how to construct them right now to get some background knowledge. Once I have sufficient information about planes and how they are built, I’ll dive into the matter of Submarines. I’ll have to learn how they are built, how they function and how they are commandet.
To gain experience with planes I bought five different ones. One is still waiting for repairings, two are completely destroyed and two are not yet assembled. All but one plane were for beginners so you can imagine how much more time it will take me to become an o.k. pilot and I assume it will not be much quicker to become an ok captain.
For the Planes I know now that there are several clubs around who also support you in training, insurance and who offer you an airfield. For the subs I have no Idea so far but I think these informations will come up as soon as I start looking.

For now I have tons of Ideas in my head. About how to cool an engine that is closed in an waterproof capsule while running as fast as a plane engine has to run. About the different propellers needed in the air and underwater. About how to change the weight of the kingfisher when it dives into water and about how to get rid of this added weight once it comes out of the water. About which and how many engines to use and about the force and size of the servos.
The longer I look into the different categories of the RC-World, the more I see and the more solutions I find. It’s a fascinating world filled with tons of things I still have to learn.
Project Kingfisher will - at the pace that I’ve taken so far - be finished not before the next two years.

Dienstag, 19. Juni 2018

Introducing the Newbies

After yesterdays crashes, demolished plains and foam parts all over the floor, today was the day to get new planes.

Tadaa:
The "Mini Trainstar” by Volantex RC. It’s tiny. It has a wingspan of 40cm and a lenght of 31cm. With its 20 gram it’s also super light. My first impression when I took it out of the box was that there is really no weight.
Something I have never experienced before is the 6-Axis Gyro. I know that a Gyro is used for filming to keep the Camera still but I did not know, that one can also hold it’s plane still with it. How it looks and how it works are yet to be discovered. What I can say from a first testflight is that it keeps your plane propperly still in the air and there is way less uncontrolled movement. Still I’m not yet familiar with the concept and I suspect the Gyro to take turns on it’s own every now and then.
Also I had my difficulties with the Elevator. Whenever I wanted the plane to rise, I just pulled up the throttle, because somehow the elevator showed no effect.
Afer all I came back from my test flight without any broken planes and some pretty nice landings. It might still be worth having this Gyro.


The T34 from Top RC Hobby. What a beauty. It’s wingspan of 75cm makes it bigger than the Mini Trainstar but it’s still small.
Here I’m a bit worried. The seller asked me if I was a beginner and of course I said yes so he looked at me with this sorrowful expression. He said this plane is quite wild.
I did not yet put it together nor unpack it further. It would really be a shame to crash it too soon. Instead I’ll take pictures of it as long as I can. It really does look good.

Montag, 18. Juni 2018

It did not


This glorious picture is symbolizing todays tests. At first I went out just with the woodman. I assumed, the glue specifically for Styropor would keep everything in place and it would just be a mather of aerodynamics and heat, wether the test would be a success or not. As you can see, it turned out differently. I started the plane with normal gas and the nose immediately began to sink. With a bit more throttle It came up again and right as I iniciated the first turn the wooden plate keeping the engine and the propeller fell off and the plane fell to the ground. All in all this took about three seconds.
As I’m used to by now, I went back home, charged the battery pack and prepared the woodman for repairing. Little did I know that they would have to wait.

As there was still daylight, I took the Shark for it’s test aswell. I remembered from the last flight that it liked to turn to the right even though I did not know why. It must have had a hard landing where something broke but with the repairings that I’ve done, I thought this’d be fixed.
As the Shark took off for the first time, it came to ground quickly in a sharp right turn. I adjusted the settings and let it take off again. This time, the Shark described a large right turn but it was impossible for me to correct it properly. Instead, as I got a bit stressed, I acceleratet the plane too much and it crashed violently. I had to collect it in pieces.

The Shark in pieces
The cabin fell off during the crash. This saved the camera which was installed on the pilots helmet. The nose that was already a bit weakened by previous crashes broke off and so did the engine. The propeller was lying somewhere in the grass and the wings took some cuts aswell.
All in all it is too much to repair. Especially the nose which I think was tilted to the right which caused the plane to always turn to the right, was so destroyed that I did not see any chance of repairings. Especially not after my glorious work on the Woodman was such a quick failure. 

As I am still far from being a good pilot I decided to order a new plane. This time it will not be Multiplex as I can not afford to continuously crash such expensive toys. I have to get something way cheaper. In the internet I found offers that are RTF ("Ready to fly” which means they are completly built and include all the necessary parts) and cost about a quarter of the Woodman. I ordered one and we will see soon, what differences there might be.

There is a video of the sharks two last flights but it’s really not entertaining and it lasts about four seconds so I’ll spare you this.

Donnerstag, 7. Juni 2018

Repairings

Before yesterday I had three RC-Vehicles and non of them was able to run.

The car has a part missing. It must have fallen off while I tested the camera. It’s the powertransmission to one of the frontwheels. Also the engine is dirty. There’s dust on all of the pieces and some overflowing fat that glues the dirt to some parts. I will have to dismantle, clean and rebuild the whole thing and order the missing piece.

New look of the Shark
The Shark, the plane with the propeller on its back, had some hard landings and therefor has some cuts. I bought some glue specifically for Styropor because I learned that I’ll need to glue these planes a lot. Also I removed some plastic cover and half of the pilots head to put a stripe of velcro. On this I want to put the camera.
Because of the change in aerodynamics I don’t know if the plane will still fly. If not, I have to put the plastic cover again and find another place where to put the camera.


To apply the wood I needed straight surfaces 
The Funman… It was really time i made some serious repairings on this plane. The engine with the propeller on it were moving almost freely back and forth. There was nothing left where I could have attached it. Therefor I went to the craftstore to look for some small, light plate of iron with some holes in it. Unfortuately there were none so bought wood instead which I cut in fitting pieces. Please note that my craft corner is my kitchentable which is unfit for any woodwork at all. Therefor the results are not very impressive but I hope they’ll do.

On the newly created woodman I’ve put two lines of velcro aswell. One directly on the snout behind the propeller and one on top of the wings in the center.
Because of the wooden snout I’m not sure if I can add even more weight to the front or if I have to put the camera further back. Also I have no Idea what pictures the camera will take if the propeller is spinning infront of the lens. All of this and a lot more are subject to further experiments.
Applied wood
Velcro for the camera


Dienstag, 5. Juni 2018

Camera - Try one

It seems like everybody nowadays wants to make movies. The moving picture has it’s fascination. Even try to put cameras on my RC-Devices.

It started with a GoPro. Unfortunately I directly took it abroad and of course lost it there. The only thing I can say about it is that the camera itself might be good but the app that comes with it is pretty poor. It wouldn’t even run on my smartphone and according to reviews on the web, the performance in general is slow and weak. A bit of a shame considering the price for these cameras is quite high.

Some days ago then I found a Video on youtube where the Pilot put a Mobius Actioncam on his plane. I was impressed by the size and the prize of this camera. It’s way smaller than a GoPro and has a better, flatter shape so there’s less drag and it costs about a third of the GoPro.

Bildergebnis für mobius action camBildergebnis für GoPro Session 5
Left the Mobius Actioncam, right the GoPro Session 5 - Imagine each of them on your plane…

So now that I have a camera again, of course I want to mount it on every device. This is easely possible by using some velcro on the cam and on the devices. To avoid the camera from shaking too much I first tried to put a line of foam between the car and the velcro and went out immediately

These were the results from my testdrive with my car:
Driving low speed, the foam reduces the vibrations of the car so the camera provides a good image. As soon as the car goes faster, the camera shakes way too much so the quality of the image gets worse. Especially on fast turns, when the camera tilts to the sides.
During the testdrive the velcro that was glued to the foam went loose. I then put it directly on the car. The results were better than with the foam but still not good enough for me. I’m thinking about combining the two techniques somehow to cushion the camera while keeping it steady.


Dienstag, 22. Mai 2018

Kingfisher - A project in the mind

It is terrible. I tell you.
Whenever my mind drifts away in everyday life I start building the Kingfisher in my head and I always encounter some difficulties.
There are several problems which all are connected. Starting with the propeller. A propeller for a plane needs a different shape than a propeller that functions in water. I’m also thinking about a jet engine but this requires further studies. Right now I’m more into having two or three propellers on the vehicle. One for air and one or two for water. This requires two ore three engines to have enough power which again requires either one huge or several battery packs. This then leads to some gain in weight which brings us to the next problem:
The weight needs to be light enough for the machine to fly but heavy enough to be able to dive into water. A solution for this would be to make openings which allow Water to flow inside some parts of the Kingfisher. This would bring a loss of weight and therefor make it easyer for the device to sink. It - on the other hand - also makes it more difficult for the device to get out of the water again as it should be able to do.
To master the transfer from air into water we need a certain stability. The material should therefor be light, waterproof and super strong. Waiting on the surface is for amateurs. I want to fly and dive into the water with almost no delay. I was thinking of aluminum or wood but I’ll need some time to discover more different materials. Maybe there’s something printable with a 3D printer.

There’s still a lot to learn and to think about this whole project.

Montag, 21. Mai 2018

Flight 3

20.05.2018
About 1630 o Clock
ca. 19°C
Wind:  6km/h
Partly Clouded

One can say my repairings are not very efficient. The more I repair, the shorter the flight periods. My main problem is to keep the engine with the propeller in a stable postition.
If you look at the plane from the nose, the first thing you see is the propeller. Behind it there’s the engine surronded by this white plastic calles Elapor. The engine was fixed with some screws and a drop of glue. Now because I usually crash nose first into the ground, The propeller gets all the force of the crash and transmits it to the engine and then to the plastic. This elapor is some sort of compressed Styrofoam. It’s very light but more stable. Still its just some kind of foam and after some crashes it gets loose.
By now the engine can move freely back and forth for about two centimeters. This is the reason why it wobbles when running and when it wobbles, the propeller is not functioning anymore.
On the other hand I can not put screws in the foam because they’ll not be stable enough and I can barely put glue because I can’t reach it properly.
Also the elapor above the engine is broken and only kept together by duct tape.
I’ll have to see, if I find something at the craft store to fix this.

The flight itself was ok. I managed to start from a street but i’m scared because of the hedge right aside of it. A little wind and the plane is stuck four meters above ground in a bush. Preferably with thorns.
It was also possible to fly a looping, this time a controlled one, and keep the plane flying straight for some time.


Things to remember
- If you press the right stick on the remote, the steering is reduced. This is good for high speed but terrible for starting.
- The engine has to be built into the plane in a stable way.
- Parts that take a lot of hits should be exchangeable. In this case the nose and the wings of the plane.
- Using the tail rudder to move left or right will cause the plane to tilt. To correct that, you need to use the elevator.

Sonntag, 20. Mai 2018

Flight 2

19.05.2018
About 1000 o Clock
ca 12°C
Light Wind
Sunny

The weather conditions were better this time. It was sunny and nice. As I’ve already repaired the plane and charged the battery packs I went to the same spot as the last time. I also started the plane the same way and finally I was able to fly for some minutes.
The secret lies in the throttle. If there’s too little speed while starting, the plane crashes immediately. If there’s too much, there’s not much time to correct before it starts going crazy.
For me it was also important to see that I continuously have to play with both the livers on the remote. For now there are only two but later on there will be more…
Picture by Multiplex

My remote was included in the “Funman” Set. It has the throttle and the rudders for going left and right on the left stick. The rudders bringing the plane up or down are on the right one.
So if you push the left one forward, the plane accelerates and therefor rises. if you push the right stick forwar the plane descends. It is not always easy to know which liver to pull or push as the plane moves freely in every direction in a very dynamic way. There’s also no way to stop and take a second. Every action you take is immediately followed by a reaction of the plane.

I started the plane some four times. I landed it once. You can imagine the other three times it came down. It was usually after some two, three minutes that I got distracted, made a mistake or looked at something else than the plane for just a second and it hit the ground.
The problem is now, that because of all these crashes the engine with the propeller on it moves inside the plane. Also the rear wings which are glued to the plane did not stay in place. They propably took one too many hits. Therefor I went to a craft store and bought some instant glue and some better duct tape. Right now everything is drying off and getting ready for another flight. I do not yet know what to do if there are better repairs required.

Things to remember:
- White glue doesn’t do the job
- Paper tape or normal duct tape doesn’t do the job either
- Throttle is key - less is more
- The commands have to be as dynamic as the plane

Overwiew over the repaired plane
The front is the most exposed and therefor most repaired part. Now I use stronger duct tape.

The horizontal rear wings are glued to the body of the plane. I now use instand glue hoping to keep the wings attached to the body for longer.


Flight 1

14.05.2018
About 1700 o Clock
ca. 12°C
Light Wind
Rainy

The conditions for my first flight where not perfect. It was a bit too rainy and a bit too windy. Still I was motivated and took the Tram to go where I knew there was a field which was recently cut. It’s about a hundret meters long and some thirty wide.
As I was standing more or less in the middle I had a footpath and a hedge behind me, some open fields in front, on my left a street with no traffic and on my right the tramline. It’s not perfect, especially because of the tramline but there are no better spots around so it has to do.
I put the battery pack in both sender and plane, adjusted the center of gravity by moving the battery pack back and forth and then closed the plane. At first I wanted to start it from the ground. It has wheels so there should not be problems but the ground was by far not even enough and the grass still too high.
I held the plane by it’s tail, gave full throttle to the engine and then threw it gently forward. As the throttle was way too high, the plane flew a fast looping. As it was rising for an other looping i reduced the trottle. The plane stopped midair standing upright, turned upside down and crashed straight in to the ground.
I have to admitt, these planes are built to last.  After some adjustments on the spot it was all ready to fly again. I started it the same way. As I reduced the throttle immediately, the plane flew a turn and landed in a tree in the hedge behind me. Only with climbing and shaking branches it was possible to get it back. I found it with some traces in the wings and a broken nose. Now it was not possible anymore to fly it so I took it back for reparations.

Things to remember:
- Increasing throttle causes the plane to go faster but also to rise.
- Take a roll of duct tape with you.
- Having the propeller in front is not recommendet for beginners. I did not believe it, now I know.
- The battery pack is quickly out of power.

Picture: Damaged plane after the first flights

And so it begins

The idea of “Project Kingfisher” is to create a remote controlled vehicle which is able to fly, without interruption dive into water and vice versa. Just like this tiny blue bird calles “Kingfisher”.

As I had no knowledge of building any remote controlled devices, I bought a book about a remote controlled plane. By reading this I learned about engines, sender and reciever, steering servos and so far. I will elaborate more about the specific parts by the time they cause me trouble.

For further training purpose I bought a remote controlled car. It’s brand is Tamiya. The base is a chassis called “TT-02” It’s a hard plastic shell where you put the engine in and then build the power transmission from the battery pack to the engine to the wheels. On top of the chassis there is a cover in the shape of almost any car you wish made of see trough plastic which you can colour yourself. I painted mine in black and red, leaving the windows free in case I want to install a camera inside once.
Building this car was simple and nice. It took me about six hours and then worked without causing any trouble.
One bad point about this system is that as soon as you drive it outdoors all the durs and little rocks are thrown inside the car and will stay there. You’ll need to clean it properly after using it.
Another point is that you need a wide street or area to drive on where you can not break anythin nor get hit by other cars and stuff. The Tamyia TT-02 is quite fast in acceleration and top speed - for me as a beginner.


There’s an installment for a go pro camera above the engine but I lost the camera before I even tried running it...


To advance in my studies for Project Kingfisher I bought a plane on the 11.05.2018. It’s a RTF (Ready to fly) model of the Multiplex “Funman”. As it is “Ready to fly” I did not need to install much. The engine, the steering servos and the reciever where already built in so I just needed to put the wings and the propeller.
A remote including batteries, a battery pack for the plane and a charger are included in the set. I used some white glue as we used for everything when we were children and went for my first flight.

Picture by Multiplex